Loading data...
Loading data...
Loading data...
In this article, I will share the process of setting up CI/CD (Continuous Integration/Continuous Deployment) for my personal blog. Automating the testing and deployment process helps me save time, minimize manual errors, and maintain the quality of the blog consistently.
If you’re managing a small blog or website, this could be an easily applicable CI/CD solution.
Time-saving: Updates and deployments are handled automatically.
Error reduction: Each update is tested before being deployed.
Scalability: Adding features or making changes is as simple as updating the source code.
GitLab CI/CD: Manages and automates the source code pipeline.
VPS and Nginx: A server (I use Ubuntu) to host the blog and configure Nginx as the web server.
Docker (optional): Packages the application into containers for easier deployment and management.
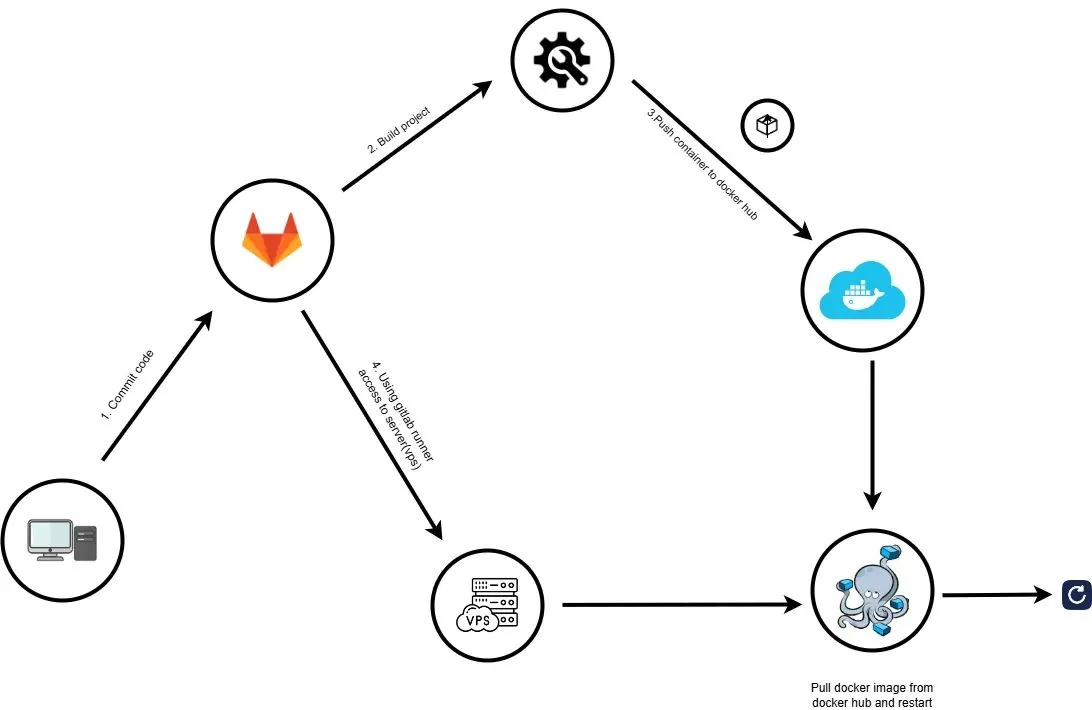
I created a .gitlab-ci.yml file in my repository to set up the CI/CD pipeline. This file includes the following:
Build stage: Packages the project into a Docker container and pushes it to Docker Hub
Package the project into a Docker image.
Push the image to Docker Hub.
  build:
      stage: build
      image: docker:25.0.3
      services:
        - docker:25.0.3-dind

      before_script:
        - echo "$CI_REGISTRY_PASS" | docker login -u "$CI_REGISTRY_USER" --password-stdin
        - echo "ENV_VARABLE=$ENV_VARABLE" >> .env

      script:
        - echo "Start building source code..."
        - docker build -t $REGISTRY/$IMAGE_NAME:$IMAGE_TAG . # build docker image
        - docker push $REGISTRY/$IMAGE_NAME:$IMAGE_TAG # push docker image lên docker hub
- echo "Complete build source code..."Access the server using GitLab Runner.
Stop the currently running Docker container.
Pull the new Docker image from Docker Hub.
Start the new Docker container.
    deploy:
      stage: deploy
      needs: [build]
      before_script:
        - echo "$CI_REGISTRY_PASS" | docker login -u "$CI_REGISTRY_USER" --password-stdin
      script:
        - echo "Start deploy source code..."
        - cd <project path>
        - docker compose stop interface $ALIAS dừng container đang chạy
        - docker compose rm -f $ALIAS # xoá image liên quan
        - docker compose pull $ALIAS # pull image từ docker hub
        - docker compose up -d $ALIAS # chạy container
        - echo "End deploy source code..."
      only:
        - main
      tags:
- <project runner tag name>With this CI/CD setup, I can quickly update the blog with a single push to the repository.
Each change is automatically tested and deployed, allowing me to maintain a stable blog with minimal effort.
Setting up CI/CD for a personal blog is a small step that brings long-term benefits. It not only optimizes the workflow but also provides an opportunity to learn and apply DevOps tools in practice.
I hope this article will be helpful for you as you implement CI/CD in your own projects!